Choosing What to Capture
This option allows you to choose whether to capture the screen, a window, a window client, a rectangle or a shape. Right mouse click on the Capture Express icon in the system tray and left click on the Capture Image menu item or press the Manual Capture hot key to activate this window. The hot key is defined in the Manual Capture preference settings.
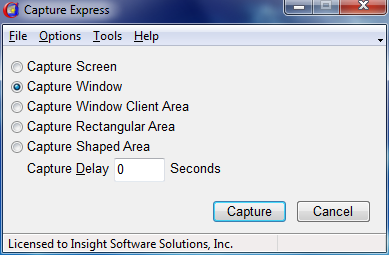
What to Capture
This window allows you to choose what you would like to capture. Whatever you have selected as the default in the Manual Capture preference settings is displayed as the default each time you press the hot key. Simply press the Enter key or click on the Capture button to start the capture.
Make another selection if you want to capture something besides the default. Then click on the Capture button to start the capture. Press the Cancel button if you decide not to capture an image.
Capturing Screen, Window or Window Client
If capturing a Screen, Window or Window Client, the capture will take place immediately upon clicking on the Capture button. You will be presented with the choice of saving, printing, copying or sending an email of the image.
Right click on system tray icon > Left click on Capture or Press Hot Key to start capture
Capturing a Rectangular or Shaped Area
When capturing a Rectangular or Shaped area the Capture Express screen immediately hides itself upon pressing the Capture button. You will be presented with a mouse pointer next to a black bar containing the words "Left Click on the Mouse to Start the Capture" in white text. This black bar will follow the mouse around until you click on the left mouse button.
A left mouse click marks the upper left corner of the image to be captured. As you move the mouse you will see (depending on your Highlight Style preference setting) the outline of the shape or an inverted view of the shape being captured. The size of the image in pixels is displayed as you capture the image.
The message to right click to toggle between stretch and move is also displayed. Right click on the mouse to change to a move mode. The move mode will reposition the outline of the shape in case you started the capture in the wrong position. Right click again to switch to the stretch mode to again change the size of the image being captured. With this method you can capture exactly what you want without a lot of "retries" or "cancels".
Rectangular Area
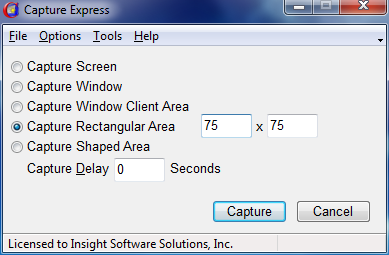
The Rectangular Area provides an option to predetermine the size of the capture. Insert the size coordinates in the two fields, the first being the width and the second box the height. After pressing the Capture button, left click once with the mouse to place a rectangle on the screen of the dimensions requested. Drag the rectangle to the exact position wanted and left click to capture the image.
The dimensions are not saved after closing Capture Express and restarting the program. Leave the dimensions blank to draw a rectangle of whatever size needed.
Capture Shaped Area
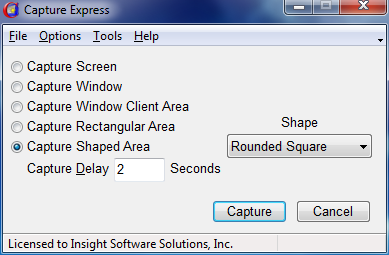
When capturing a Shaped Area select the type of shape desired from the drop down list and click on the Capture button to capture the image in the shape selected.
Capture Selections
This section describes the capture options available. The choice defaults to the selection you made in the Preferences. Your most frequently used capture item should be set as the default.
Capture Screen
This option takes a snapshot of the entire screen. Capture Express hides itself first so that it won't be caught in the snapshot.
Capture Window
This option takes a snapshot of whatever Window was on top or had focus when Capture Express was invoked with the hot key.
Capture Window Client Area
This option takes a snapshot of the client area of whatever window was on top or had focus when Capture Express was invoked with the hot key. The client area typically includes the entire window except for the caption bar, menu and borders.
Capture Rectangular Area
This option captures a rectangular area of the screen. It is the same as the "Rectangle" shaped option described in the "Capture Shaped Area" topic. Since the Capture Rectangular Area is a popular choice for capturing images, it is listed as a separate option for user convenience.
Capture Shaped Area
Use this option to capture an image in the shape that you want. The following is a list of shapes that can be captured:
|
Shape |
Description |
|
Rectangle |
This captures a rectangular area of the screen |
|
Square |
This captures a square area of the screen |
|
Rounded Rectangle |
This captures a rectangular area of the screen where the corners of the rectangle are slightly rounded. |
|
Rounded Square |
This captures a square area of the screen where the corners of the square are slightly rounded. |
|
Circle |
This captures a circular area of the screen |
|
Ellipse |
This captures an elliptical (oval) area of the screen. |
|
Triangle Up |
This captures a triangular area of the screen. The triangle points up. |
|
Triangle Down |
This captures a triangular area of the screen. The triangle points down. |
|
Triangle Left |
This captures a triangular area of the screen. The triangle points to the left. |
|
Triangle Right |
This captures a triangular area of the screen. The triangle points to the right. |
|
Diamond |
This captures a diamond shaped area of the screen. |
|
Star |
This captures a star shaped area of the screen. By default, this is a 5 pointed star, but can be adjusted in the configuration section to have many more points. |
|
Polygon 1 |
This is a user defined polygon shape which is adjusted in the configuration section. |
|
Polygon 2 |
This is a user defined polygon shape which is adjusted in the configuration section. |
|
Polygon 3 |
This is a user defined polygon shape which is adjusted in the configuration section. |
|
Polygon 4 |
This is a user defined polygon shape which is adjusted in the configuration section. |
|
Polygon 5 |
This is a user defined polygon shape which is adjusted in the configuration section. |
All shapes except the rectangle and square can optionally have a border placed around them in any color and also have a color placed around the shape (i.e. the mask) that is being captured. These settings are made in the Preferences section and cannot be changed at the time of capture.