Manual Capture
You can perform two types of captures, either Manual or Automatic. With the Manual Capture you start by pressing the hot key defined in this preference panel. The Capture Express window opens allowing you to choose what to capture - window, screen, shape, etc. Make your selection or leave the default choice and start the capture. When the capture is complete, another Capture Express window prompts you to do something with the image - save to file, copy to clipboard, email or print. Select your default choice or choose one of the other options. The process is finished.
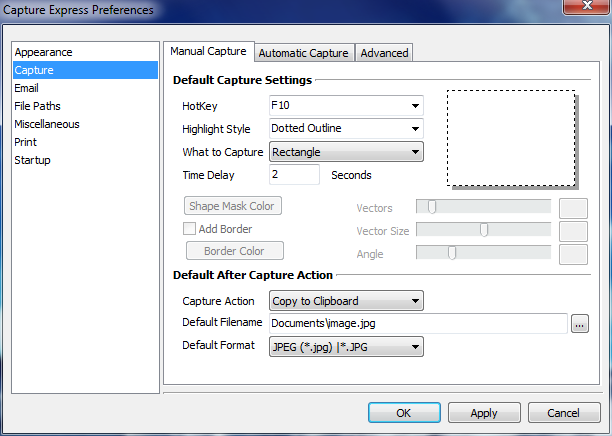
Capture Express > Options > Preferences > Capture > Manual Capture tab
Default Capture Settings
Hot Key
Select the hot key combination that you will use to manually start a capture process. Choose the hot key from the drop down list or press the desired hotkey when the cursor is in the HotKey field. Pressing this hot key while Capture Express is running initiates the capture process.
Highlight Style
Select from the drop down list how you would like to outline the image that you are capturing. These styles are only applicable when capturing a shaped image such as a circle, rectangle, square, etc. They are not needed when capturing screens, windows or window client areas.
Dotted Outline
This places a dotted line around the image that you are capturing. It will show you what is included in the capture area.
Dashed Outline
This is similar to the dotted line. It displays larger lines around the image being captured.
Reverse Video
This displays the area to be captured in a reverse image. The reversed area is what will be captured.
What to Capture
Choose from the drop down list which type of capture you will most frequently make. When you start the manual capture you can select an option other than the default. Your most frequently used capture item should be set up as the default.
Capture Screen
This option takes a snapshot of the entire screen. Capture Express hides itself first so that it won't be caught in the snapshot!
Capture Window
This option takes a snapshot of whatever Window was on top or had focus when Capture Express was invoked with the hot key.
Capture Window Client Area
This option takes a snapshot of the client area of whatever window was on top or had focus when Capture Express was invoked with the hot key. The client area is usually the entire window excluding the caption bar, menu and borders.
Capture Rectangular Area
This option captures a rectangular area of the screen. It is the same as the "Rectangle" shaped option under the next heading of "Capture Shaped Area". It is listed as a separate option for convenience as it is a common option.
Capture Shaped Area
This option allows you to choose a shape that you wish to capture. The following is a list of shapes that can be captured:
|
Shape |
Description |
|
Rectangle |
This captures a rectangular area of the screen |
|
Square |
This captures a square area of the screen |
|
Rounded Rectangle |
This captures a rectangular area of the screen where the corners of the rectangle are slightly rounded. |
|
Rounded Square |
This captures a square area of the screen where the corners of the square are slightly rounded. |
|
Circle |
This captures a circular area of the screen |
|
Ellipse |
This captures an elliptical (oval) area of the screen. |
|
Triangle Up |
This captures a triangular area of the screen. The triangle points up. |
|
Triangle Down |
This captures a triangular area of the screen. The triangle points down. |
|
Triangle Left |
This captures a triangular area of the screen. The triangle points to the left. |
|
Triangle Right |
This captures a triangular area of the screen. The triangle points to the right. |
|
Diamond |
This captures a diamond shaped area of the screen. |
|
Star |
This captures a star shaped area of the screen. By default, this is a 5 pointed star, but can be adjusted in the configuration section to have many more points. |
|
Polygon 1 |
This is a user defined polygon shape which is adjusted in the configuration section. |
|
Polygon 2 |
This is a user defined polygon shape which is adjusted in the configuration section. |
|
Polygon 3 |
This is a user defined polygon shape which is adjusted in the configuration section. |
|
Polygon 4 |
This is a user defined polygon shape which is adjusted in the configuration section. |
|
Polygon 5 |
This is a user defined polygon shape which is adjusted in the configuration section. |
All shapes except the rectangle and square can optionally have a border placed around them in any color and also specify the color to use to place around the shape (i.e. the mask) that is being captured. These settings are made in the configuration section and can only be changed there and not at the time of capture.
Time Delay
You can optionally set a delay between the time you press the hot key and the time that the capture takes place. This delay allows you to capture menus, pop ups, etc. that are often more difficult to capture. For example, just press the hot key, open the menu, wait the allotted delay time and the menu is captured as part of the image.
Mask and Border
For shaped capture items, you can set up different characteristics such as if you want a border around the object, the color of the border, masking colors around the shape and even what the shape is for the five polygon and star shapes.
Set Shape Mask Color
The images are stored in rectangular shapes. When capturing using a shape, the shape is placed inside rectangular coordinates. The area around the actual captured shape but within the rectangle is called the mask. You can choose to set the color of this area to whatever you like. This applies to all capture items except the screen, window, window client, rectangle and square. These shapes do not have any areas that are masked out.
Add Border
You can specify that you want a border placed around the shape that you are capturing. Check this option if you desire a border. By checking this option, you will have the option of specifying the border color. This applies to all capture items except the screen, window, window client, rectangle and square.
Border Color
This option is available if you choose to have a border placed around the shape. This specifies the color that the border will have. This applies to all capture items except the screen, window, window client, rectangle and square.
Vector and Angle
The Vector and Angle options are used with the star and polygon shapes. You can use these options to custom create shapes. The best way to find out what these options do is to experiment with them. Select a polygon and start moving the slider bars to see how the shape is affected.
Vectors
The Vectors option is only available for the star and polygon shapes. Select the number of lines you want in the polygon. For example, if you have 3 vectors, you will end up with a triangle, 4 for a rectangle, 6 for a hexagon, etc. - depending on the vector size you have chosen.
Vector Size
The Vector Size option only applies to the star and polygon shapes. This option determines the length of the vectors. If you use a short length, then the shape will connect the vectors in a more circular shape. If they are longer, then they will connect inward. For example, if an 8 vectored (sided) polygon has the vector size set as short as possible (at zero), then it will form an octagon. If the length is increased to something like 66, it will form a 4 pronged star shape.
Angle
The Angle option is only available for the polygon shapes. After the shape is defined you can rotate the shape from 0 to 360 degrees.
Default After Capture Action
Capture Action
Select from the drop down list what you would like to do with the image after it has been captured. This will be the default setting. You can manually change your option after the capture.
You can choose to save the image to a file, email the image, copy the image to the clipboard or print the image.
Default File Name
This option allows you to save the captured image as an image file. You will be prompted with a standard save dialog box where you can enter a name and path for the file. If the Include Image Counter in Default Filename option is enabled, then the file name will default to image0001 for the first save after running the program. The second capture will default to image0002, etc. You can override the default file name by typing another name over top of the default
Default Format
Select the default type of image. You can select from the .bmp, .jpg., .gif, .png or .tif file formats.